Learn how to make your own solar panels!
The first thing you’ll need if you’re going to solar power a home is solar panels. Solar panels can either be bought online or in stores or you can build your own solar panels at home.
Get A FREE Home Solar Quote Now
Should I Buy or Build Solar Panels?
If you make your own solar panels, one of the obvious advantages is that they are much less expensive, especially if you need high powered solar panels.
Sure you can find solar panels for sale everywhere these days, at what would appear to be great prices. But take a look at how powerful they are and you’ll soon realize that you need stronger panels (either that or you would need to join way too many of them together to get the power you’ll require). This is not favorable for those on a limited budget or with limited space.
This is why building your own solar panels is the best choice for affordability and for that extra level of personal control over the project.
When you build your own solar panels, you not only save money, but you can maximize and customize your solar system easily and inexpensively instead of being at the mercy of retail solar panel sizes and prices.
Build Solar Panels With Our Free Solar Panel Plans!
Whether you choose to buy or make your own solar panels is your choice.
For the purposes of the examples on this website (and in our solar panel plans below), we will teach you to build solar panels that are “standard sized” and capable of producing about 63 watts of power.
Later we’ll show you how to arrange these “standard panels” (by wiring them together) so that you can increase your solar power to meet your specific energy needs.
In other words, once you use our solar panel plans to learn how to make these standard sized solar panels, you will be able to add as many of them together as you want to create the system that best accommodates your home’s energy requirements. This way, you have the option of starting small and then increasing your solar power potential as you go or whenever you want to in the future.
Make Your Own Solar Panels Any Size You Want
Special Note About The Size of Your Solar Cells
The solar cells we use to build solar panels are rated at 1.75 watts each. This is just one size you can use to make your own solar panels but you don’t have to settle with this. If you want to, you can use bigger solar cells and make way more powerful solar panels.
By increasing your cells’ power, you won’t have to make as many solar panels or use as much space or materials. So please don’t feel you have to stick to the standard sized solar cells used in the examples. These sizes were chosen for these examples because they are the standard, they are widely available, inexpensive, and easy to work with & understand.
If you really want to build solar panels that are much bigger (more powerful) with the materials available today, you could substitute the solar cells used in the examples on this page with mono crystalline solar cells rated at 41 Volts and 5.49 Amps. If you use 72 of these solar cells to make one panel, your one finished panel will be able to deliver 225 Watts of power maximum in optimal sunlight.
So keep in mind that you can buy any sized solar cell you want and substitute the new cell’s volts, amps, and watt ratings in the examples below to create a more powerful solar panel.
Solar Panel Plans: Step By Step Instructions On How To Make Solar Panels
Safety First! Here are some important solar safety tips.
Also when you build solar panels, always make sure, you wear gloves during the handling of solar cells so you don’t get oil on the cells and reduce their effectiveness.
Step 1:Buying Solar Cells
The very first action you must take is to buy some solar cells. These are the individual photovoltaic units that get joined together to make up your solar panel.
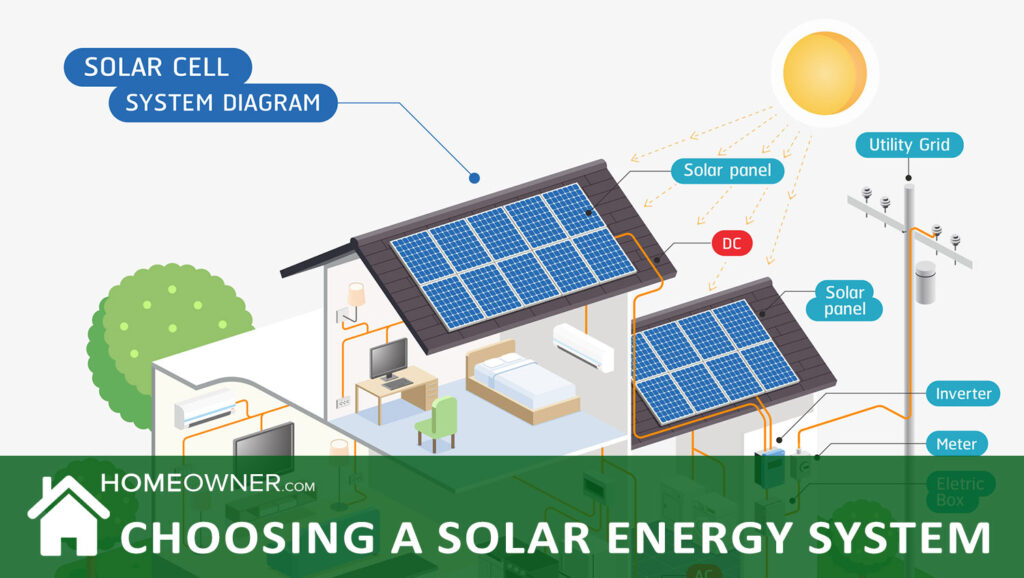
Basically, they are made of a semi-conductor material that collects energy from the sun and turns it into DC – direct current, which is then converted to AC – alternating current (with a power inverter) and used to power your home.
Solar cells come in many different shapes, sizes, and prices, but standard solar cells generally cost about $1-2 each and can be ordered online or bought in local home improvement and solar stores.
For the solar panel we will be building here, we will be using standard solar cells which produce about 1.75 watts each and are generally about 6 inches wide by 3 1/4 inches high.
This is just one size you can use when you build solar panels but you don’t have to settle with this. If you want to, you can use bigger solar cells and make more powerful solar panels. By increasing your cells’ power, you won’t have to make as many panels or use as much space or materials. Don’t feel like you have to stick to the standard sized solar cells used in the examples below. As stated previously, these sizes were chosen because they are the standard, they are widely available, inexpensive, and easy to work with and understand.
One of the very first things you need to do when you make your own solar panels is to attach tab wire to the connection points of your solar cells using a flux pen, flux, and solder, but if you don’t want to go through all that, you can simply buy pre-tabbed solar cells for just a little more money.
Step 2: Testing Your Solar Cells
Now that you have attached the tabs (tab wire) to your solar cells or simply bought pre-tabbed solar cells, the next step involves testing your solar cells to make sure they are working correctly before you go any further. It is important to do this before you begin to make solar panels because one bad solar cell can ruin the effectiveness of your whole panel.
Test the power readings to make sure it’s producing the right amount of watts, volts, and amps.
If you make solar panels using the same size solar cells we used here, then the solar panel you just built should be producing about 18 volts and 3.5 amps in optimal sunlight.
Whenever you have these two values (volts & amps) you can figure out the wattage by multiplying these two values together.
Volts x Amps = Watts
18 Volts x 3.5 Amps = 63 Watts
Ok, Let’s Build a Solar Panel
We are going to be building a solar panel with 36 solar cells in it arranged in rows of 9 and 4.
Since each solar cell is rated at 1.75 watts, 36 of them wired in series will give our completed solar panel a total of 36 x 1.75 = 63 watts (18 volts, 3.5 amps). This would be referred to as a 63 watt solar panel.
Free Solar Panel Plan
Step 1: Cutting Out Your Panel’s Front and Back Sides
The first step in making solar panels involves cutting out your solar panel’s front and back sides.
The front of your solar panel will consist of a sheet of clear acrylic.
The back of your solar panel will consist of a sheet of white acrylic.
Sandwiched in between these two sheets will be the solar cells – siliconed to the white acrylic sheet. This material is perfect to make solar panels with because it is weatherproof, corrosion-proof, and durable.
You must cut your pieces of clear and white acrylic to the exact dimensions of your solar panel. So how do you figure this out?
It’s simple – whatever size of solar cells you use, you must measure them out and multiply their width by 4 and their height by 9 (since we’re making a solar panel with 36 solar cells in it). This will give you the approximate width and height of your two pieces of acrylic (the front and back sides of your solar panel), but don’t cut yet.
You must first make sure your measurements include about a 1/4 inch (.25 inches) of extra space in between each solar cell (you don’t want them touching each other).
Also, leave about 1 -2 inches of extra space between the outer edge of the solar cells and the outer edge of the entire panel to allow space for the aluminum frame. Of course, this measurement depends on the size of your aluminum frame.
Lastly, make sure you leave about 2 inches of extra space at the very top of the panel to make room for certain wires that will be running there. The diagram below illustrates all the dimensions.
When you have your first piece of acrylic (the clear one) cut to size, simply cut the other piece of acrylic (the white one) to the exact same measurements – so you can build solar panels that are uniform in size and shape.
Great! The front and back sides of your solar panel are cut and ready. Depending on the size of the solar cells you’re using, these acrylic sheets should be approximately 25-35 inches wide and 30-40 inches in height.
If you don’t feel comfortable measuring everything out as described above, one easy way of cutting out the exact size of your front and back acrylic pieces is to just trace a solar cell out onto a piece of paper and then cut out the shape. Do this 36 times and then arrange the 36 pieces of paper onto your acrylic sheet in rows of 9 and 4 – exactly as you would arrange your solar cells (like in the diagram above), leaving the required space in between the cells and at the top.
After you have all of the 36 pieces of paper(representing your solar cells) arranged on your big piece of white acrylic with the right spacing everywhere, simply mark and trim off the excess acrylic so your panel is cut to size.
If you use solar cells that are 6 inches wide and 3 1/4 inches high, the measurements for your two pieces of acrylic would be 6″ x 4= 24″+ 2″+2″ (sides) + .25 x 3 = .75″ (space between panels) = 28.75″ width.
And 3.25″ x 9 = 29.25″+ 2″ (top)+1″ (top alloy frame) + 2″ (bottom) +.25 x 8 = 2″ (space between panels) = 36.25″ height.
Step 2: Connecting Your Solar Cells Together
The next step involves connecting your solar cells to each other. We will be connecting all the solar cells in each vertical column together. So, we will be connecting 4 individual columns each consisting of nine solar cells, but let’s start with doing just one.
Ready? Okay, let’s go.
1. Place two solar cells down on a clean work surface with the positive sides (back) facing up.
2. Take your flux pen and rub it against all the positive contact points on the second (lower) solar cell.
3. Line up the tabs from the top solar cell with the positive contact points of the bottom solar cell.
4. Now heat up your soldering iron, dip the tip of it into your jar of flux, apply some solder to each of the contact points and gently press the solder down against the tabbing wire and the contact. This should bond the tabbing wire to the solar cell’s positive contact point.
5. Now do the same thing for the second tab and you will have completed joining together two solar cells.
You must now continue to join more solar cells to the bottom of your “stringer” (column of cells) until you have 9 solar cells joined together in total.
Once you’re done joining together your first string of 9 solar cells, you must do the same thing three more times for a total of 4 separate strings of 9 “connected” solar cells.
Step 3: Test Your Four Solar Stringers
Before you continue to learn any more about how to build a solar panel, it’s a good idea to test the volts and amps (power output) being produced by each of your 4 columns of solar cells (stringers), just to make sure everything is working correctly.
Now that you have made sure all your stringers are working correctly, it’s time to silicon them to the white acrylic sheet used as the base/backing of our solar panel.
Step 4: Securing Your 4 Stringers To The Acrylic Backing
The next step in learning how to make solar panels involves attaching your stringers to the acrylic backing.
1. Take the piece of white acrylic you cut to size earlier and place it down on a large, clean work area, like a table. If you would like to, you can mark the acrylic exactly where your first solar cell will be placed so that you have the right starting point. After this, it will be easier to position your other stringers based on the position of the first.
2. Now take your 4 stringers and place each (one at a time) somewhere on the flat surface of the table with the back (positive side) facing up.
3. Apply a small amount of silicon (using your caulk gun) right in the center of each solar cell in the stringer (positive side).
4. Now carefully pick up your first stringer from the tabs at the top, flip it over and place it on the white sheet of acrylic (silicone side down). Make sure you place it right where you marked that your first solar cell should go on the acrylic. The stringer must be placed with the positive end on the bottom left hand corner of the acrylic sheet.
Also, make sure it’s straight all the way down (not crooked), and then gently press down at the center of each cell with just a little bit of pressure to flatten the silicon out. Careful not to break the solar cells.
5. Now do the same thing with the rest of the stringers except this time place the next stringer onto the acrylic in the reverse direction (with the negative end at the bottom of your acrylic sheet). Do not flip the stringers – they should all be on the same side (positive side of cell).
Alternate all your stringers this way (positive to negative, then negative to positive, etc) until you’re done. This alternating way of connecting your stringers is called ‘series wiring’ and we do this to increase the overall voltage of the solar panel.
So if one stringer = 4.5 volts, then 4 of them wired together in series will equal 4.5 x 4 = 18 volts.
When you’re finished siliconing down all the stringers, your solar panel should look like this:
Step 5. Connect The Stringers Together With Bus Wire
The next step in learning how to make solar panels involves wiring your stringers together.
Now that your stringers are secured to the white acrylic backing, you need to join them together using the thicker of the two wires in our materials list, the bus wire.
1. Cut a piece of bus wire long enough to reach from the first tab on the first stringer to the second tab on the second stringer and use your soldering iron, some flux, and solder to solder the tab wire to all 4 tabs.
In essence, we are connecting the two positive wires of the first stringer to the two negative wires of the second stringer.
2. Now connect the other stringers together with bus wire the same way.
3. Finally, use some tab wire to connect the two end tab wires together at the top. (Right side and left side).
Step 6. Install Junction Box and Route Wires
In this next step to making solar panels, we are going to lead our two pieces of “low gauge wire” (from our materials list) through a couple of holes we drill and into a junction box that we will install on the back of the panel.
1. First drill a hole at the top of your panel. The size of this hole must coincide with the size of the chase nipple you got.
2. Next drill the exact same size hole in the back of the junction box. We do this because the chase nipple will pass through the acrylic backing and into the junction box.
3. Now take your entire panel and carefully turn it over on the other side so you can attach the junction box from the back. The solar cells should now be against the face of the table, but be gentle – don’t break them by applying too much pressure on them. Unfortunately, this is a common occurrence when people try to make solar panels too quickly.
4. Attach the junction box to the back of your panel by applying a line of silicon around the entire outer edge of the back of the junction box. Make sure to line up the hole in the back of the panel with the hole in the junction box. Apply gentle pressure and wait for the silicon to dry.
5. Now remove the cap from the junction box and attach the double terminal strip to the inside of the junction box by first applying some silicon and then setting the double terminal strip in place as shown below. Try to keep the terminal strip clear from the edges of the junction box, but make sure that wires can still pass through the hole in the j-box/panel and to the terminal unobstructed. Let the silicon dry.
6. Turn the panel back over so you can see the solar cells again. Apply a line of silicon around the hole at the top of the panel and insert (push) the chase nipple through the hole drilled in the panel/junction box. Let silicone dry.
7. Now take the red and black “low gauge wires” you bought (as part of your materials to make solar panels) and pass the two wires through the chase nipple. Strip off the end of the black (negative) wire and solder it to the negative bus wire contact point of your solar panel. Then strip the end of the red (positive) wire and solder it to the positive bus wire contact point of your solar panel.
8. Apply some silicone to the panel right underneath and along the red and black wires to secure them to the acrylic so they don’t move around. Let silicone dry.
9. Now carefully turn your entire panel over again so you can connect the other side of the red and black wires to the terminal strip. The solar cells should now be against the face of the table, but be gentle – don’t break them by applying too much pressure on them.
10. Strip the end of the red (positive)wire. We’ll be connecting it to one of the connections in the terminal strip. To do this, simply loosen one of the “top” screws on the terminal strip (there are 4 in total: 2 on top, 2 on the bottom), pass the red wire through the hole, and re-tighten the screw.
11. Now strip the end off the black (negative) wire. We are going to connect it to the other connection in the terminal strip. To do this simply loosen the second “top” screw on the terminal strip, pass the black wire through the hole, and re-tighten the screw.
Ok, so now we have a red wire connected to the first “top” connection point of the terminal strip and a black wire connected to the second “top” connection point of the terminal strip.
It’s time to connect two more wires (black and red just like before) to the “bottom” connection points of the terminal strip. The other end of these wires will be going to your photovoltaic components (power inverter) so make sure these wires are as long as you need them to be. However the longer the wires, the higher the potential decrease in the efficiency of your system, so don’t make them longer than you have to either.
12. Connect the red (positive) wire to the first “bottom” connection point of the terminal strip, fasten tightly, and then pass the entire length of the wire through one of the holes at the bottom of the junction box.
Now connect the black (negative) wire to the second “bottom” connection point of the terminal strip, fasten tightly, and then pass the entire length of the wire through one of the holes at the bottom of the junction box.
Step 7. Finishing The Assembly of Your Solar Panel
The next step in learning how to make solar panels involves putting the final touches on your solar panel.
Turn your solar panel back over so you can see the solar cells again.
1. Take your piece of clear acrylic and place it on top of your solar panel, right on the solar cells – yes, it’s supposed to be touching them.
2. Measure the exact width and height of your solar panel and cut four pieces of C-profile aluminum frame to those exact measurements using a hacksaw or similar tool.
Add a 45 degree angle on the end of each frame piece by using a carpenter’s square. This way, the frame will fit right and look completely professional.
3. After you have cut your four pieces of C-profile aluminum frame, slip them on over the edges of the solar panel(enveloping the two sheets of acrylic in the process).
4. Now we’re going to secure the aluminum frame by drilling 3 holes on each side and putting 3 stainless steel bolts in, then screwing on the nuts on the end of the bolts. To do this, first you have to measure out 3 holes evenly spaced on each frame piece, then remove the frame pieces from the panel (so they don’t break) and drill 3 small holes (using the smaller drill bit) through each frame piece.
5. After drilling a total of 12 holes in the frame pieces (using the smaller drill bit), slip them back on and use the holes you just drilled as guidelines to drilling holes through the panel.
Make sure the frame is snug in place all the way around before you do this. To prevent the frame pieces from slipping, you can tape the corners together before you drill. An easy technique that ensures you make solar panels that look good with a professional finish.
6. Now with the frame back on, use the bigger drill bit (which should match the bolts you will use) to drill through each smaller hole, straight through the two pieces of acrylic, and through the corresponding hole on the other side.
Be very careful when drilling the holes through the acrylic. Keep the angle of your drill completely straight and don’t apply too much pressure or you could break the acrylic. This could ruin all your work so far and you’d have to go and make solar panels all over again.
7. After drilling all the holes as described above, insert your stainless steel bolts through the holes, slip on a washer and tighten the nuts on the other side.
8. Now finish the process of making solar panels by applying some silicone along the inner edge of the c-profile aluminum frame to seal it all the way around on both sides and make it waterproof.
That’s it! Congratulations, you have built your first solar panel.
You can build solar panels like this, over and over, until you have as many as you want or need. After you make solar panels, carefully test them to make sure everything is working properly.